Installing RNAvigate
If you have any questions about installation, please submit a GitHub Issue.
Docker: beginner-friendly, local, any OS
Conda: command-line, local or remote, flexible but requires dependency management
Pip: command-line, local or remote, flexible but requires dependency management
`VS Code`_: full IDE, local, worthwhile workflow improvement with more setup
UNC Longleaf: for UNC users working on the Longleaf HPC cluster
Developer installation: VS Code devcontainer for contributing code
Remote HPC cluster via VS Code: local VS Code window with access to HPC files and compute resources
Each method follows the same three steps:
Install dependencies: set up RNAvigate and Jupyter in your environment
Open a notebook: launch JupyterLab in a browser or open a notebook in VS Code
Test the installation: run a sample plot to confirm everything works
Docker
With this method, you don’t have to worry about managing dependencies or setting up JupyterLab: the Docker container takes care of all that for you. The container runs a JupyterLab server that you connect to from your browser.
Install Docker and Run the Container
Install Docker Desktop.
Open Docker Desktop and search for
psirving/rnavigate.
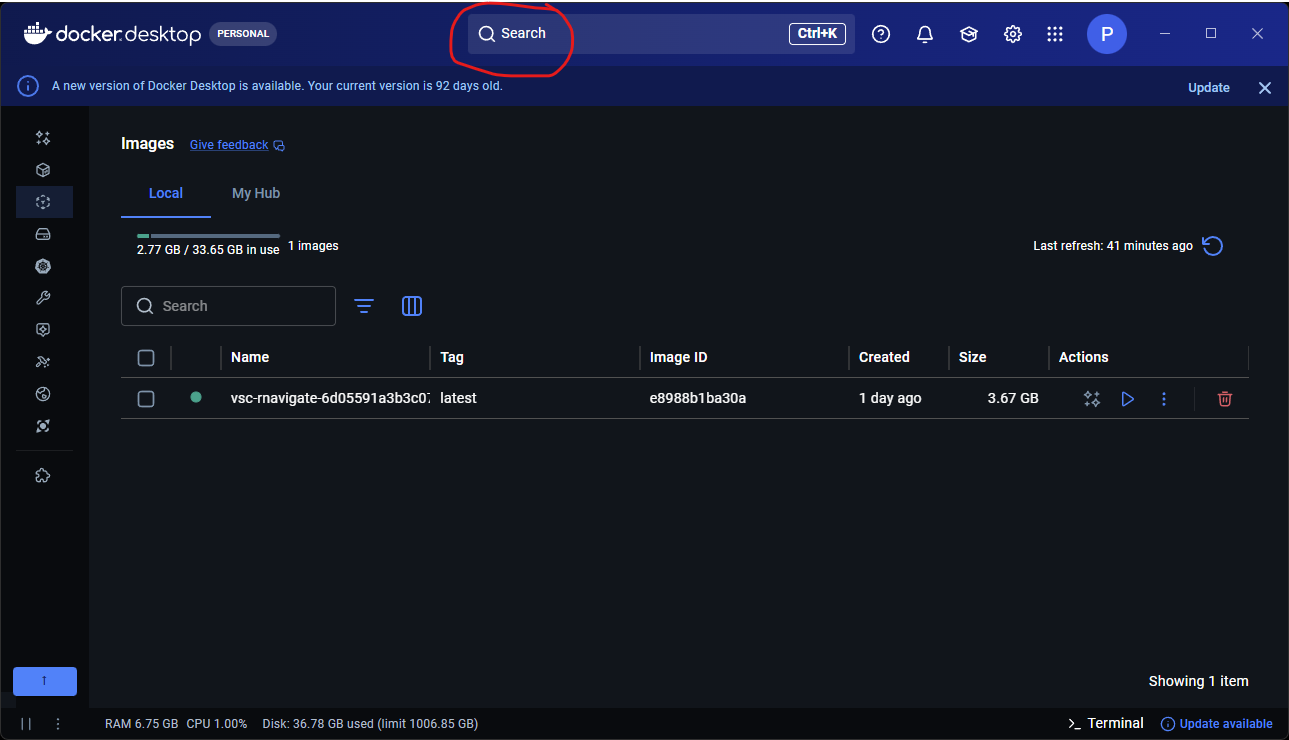
Make sure the tag is set to
latestand click Run.
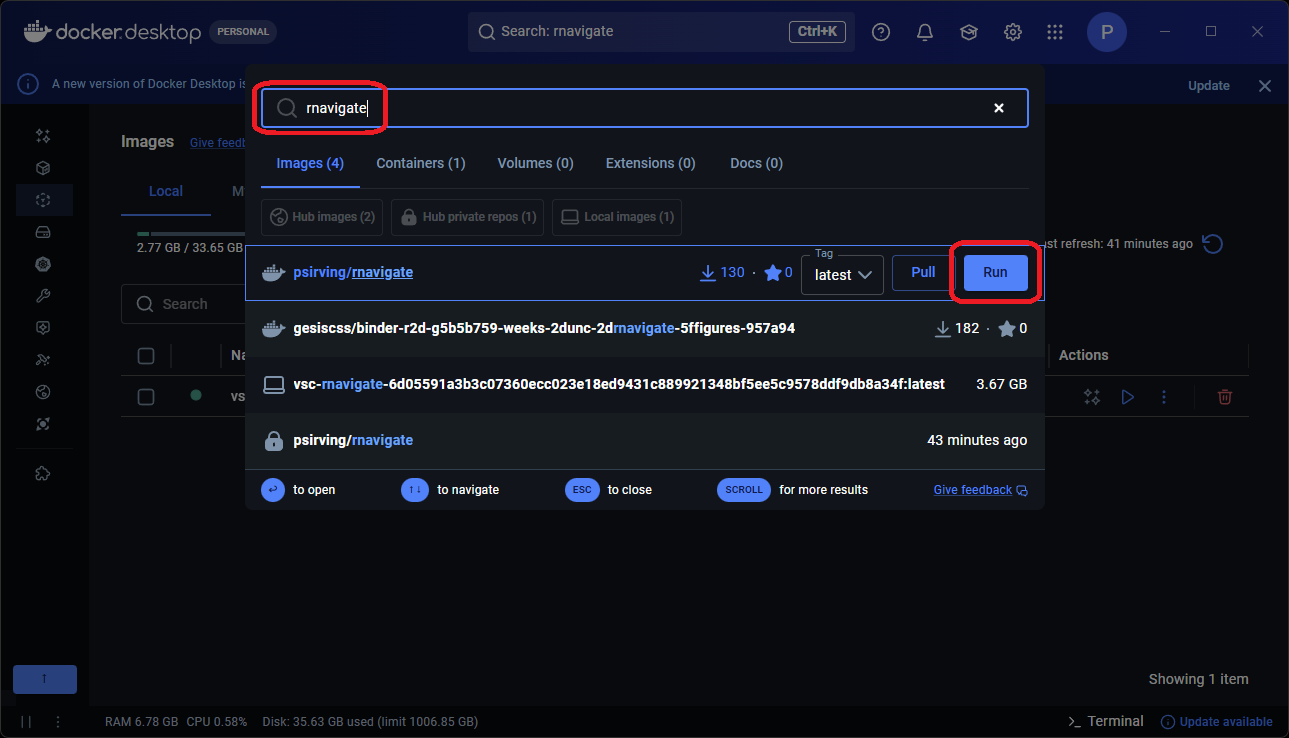
Expand the Optional settings drop-down and enter the following:
Container name:
RNAvigateHost port:
8888Volumes:
Host path: use the (…) button to choose a directory.
Container path:
/home/jovyan/work
Note
Choose a Host path that contains your data files. RNAvigate will only have access to this directory.
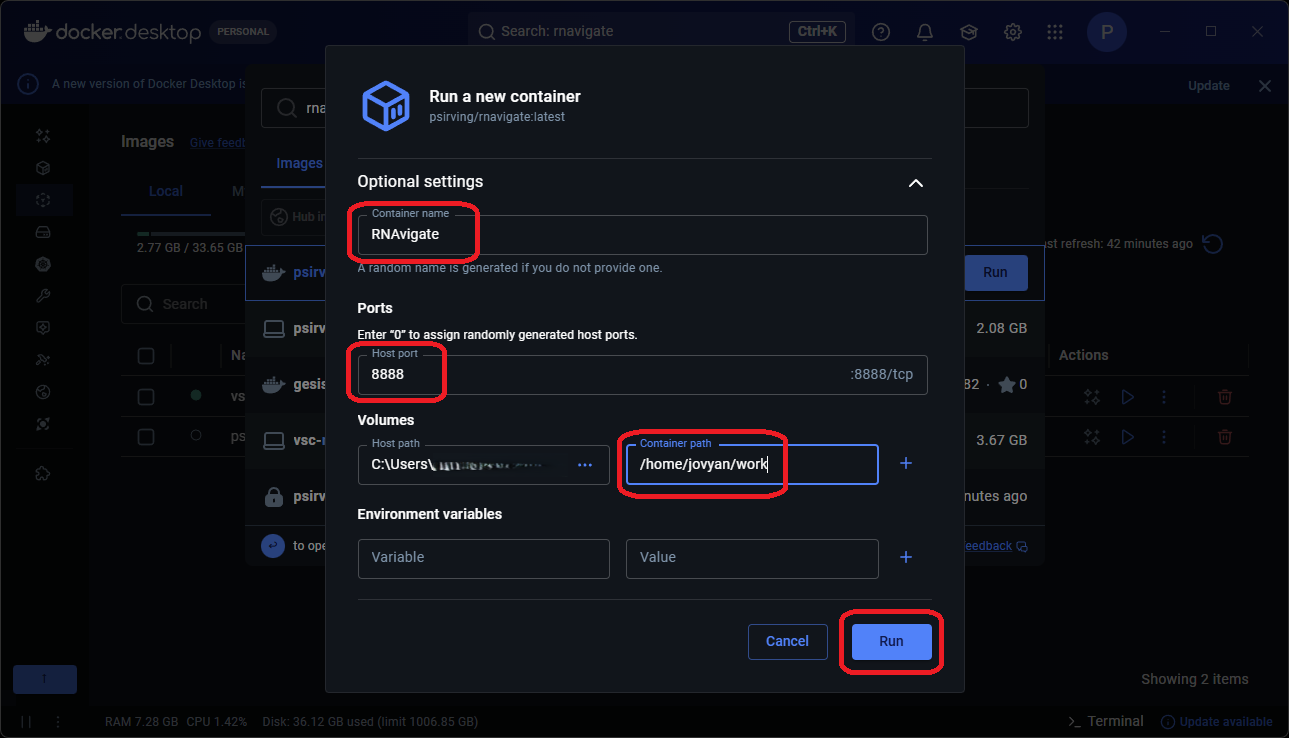
Click Run. A terminal window opens showing the container logs.
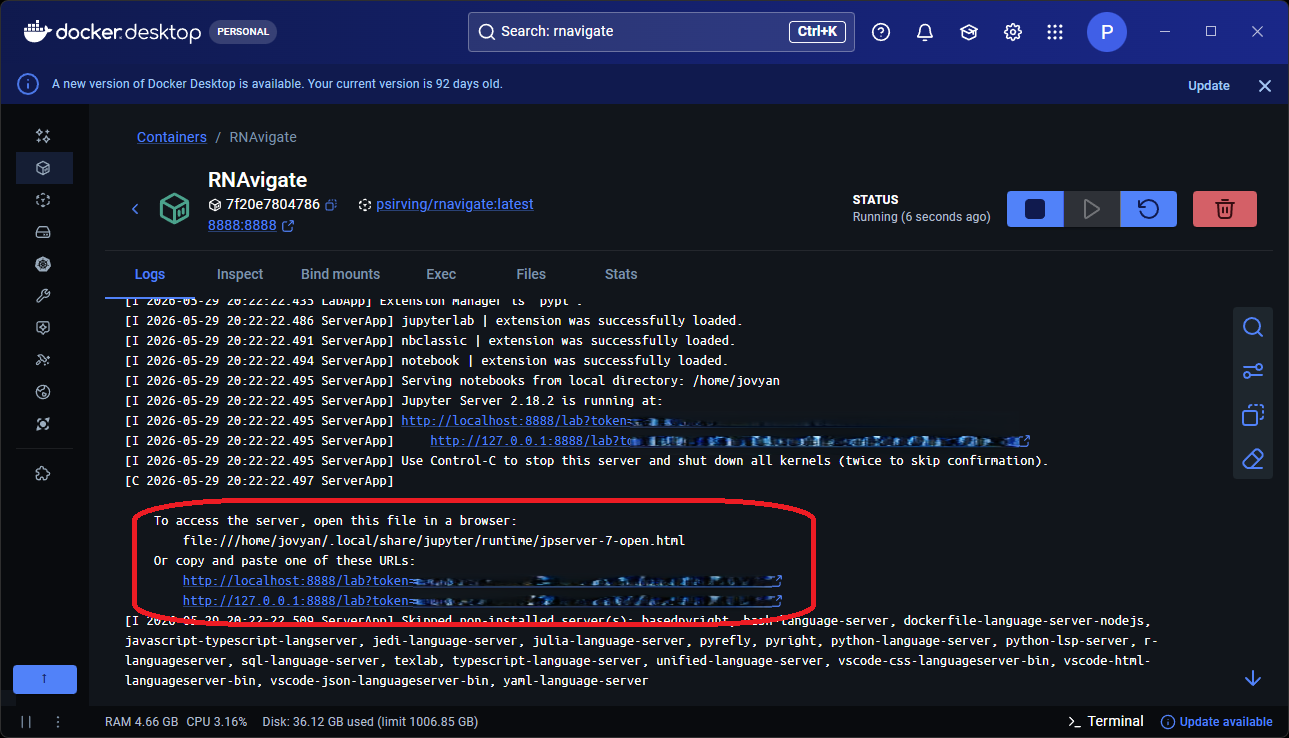
Connect to JupyterLab from Docker
Click one of the links shown in the terminal to open JupyterLab in your browser.
Click on the Work directory; this is linked to the host path you set in step 4.
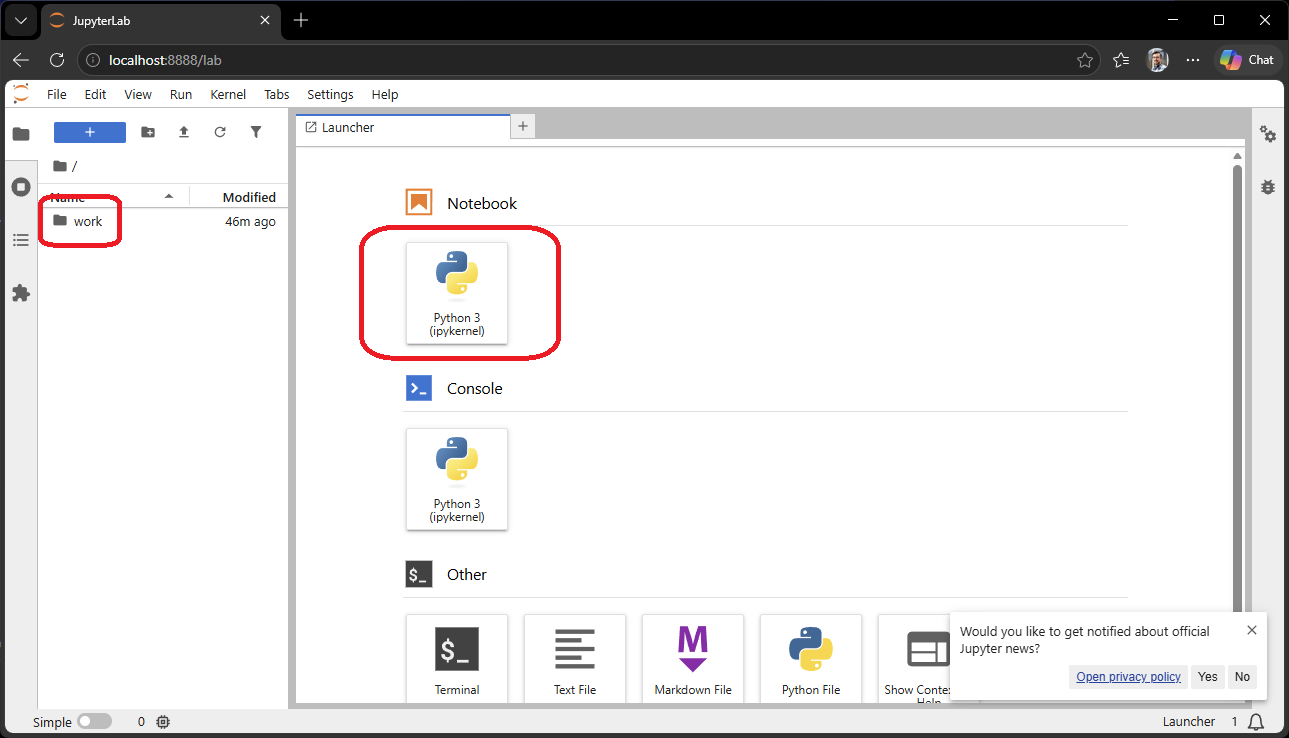
Open a new Jupyter Notebook.
Test Docker Installation
See Test Plot below.
Stop and Restart
Stop: In Docker Desktop, click the Stop button on the container.
Restart: Open Docker Desktop, go to Containers, click Start on the RNAvigate container, then click (…) > View Details and return to step 6.
Conda
Use this method if you prefer conda or mamba, or if Docker is unavailable. Care must be taken to ensure environment dependencies are managed correctly, but this method is more flexible than Docker and works on HPC clusters.
Install Conda and create the environment
Download the
environment.ymlfile.
curl -O https://raw.githubusercontent.com/Weeks-UNC/RNAvigate/master/environment.yml
Note
On Windows, open the URL above in a browser and save the file as environment.yml.
Create the conda environment. This step can take several minutes: grab a coffee.
conda env create -f environment.yml
Note
To keep track of the RNAvigate version in the environment name, change the name in
environment.yml before running the command above. For example, change
name: rnavigate to name: rnavigate_v0.0.0. Below, replace
conda activate rnavigate with conda activate rnavigate_v0.0.0.
Activate the environment.
conda activate rnavigate
Connect to JupyterLab
Launch JupyterLab.
jupyter lab
A browser window will open automatically. If not, copy the URL from the terminal.
Test the Installation
See Test Plot below.
Pip
Use this method if you prefer pip and virtual environments.
Connect to JupyterLab
Launch JupyterLab.
jupyter lab
A browser window will open automatically. If not, copy/paste the URL from the terminal.
Test the Installation
See Test Plot below.
VS Code: more setup, local or remote, excellent interface
This method requires a little bit more setup than the others, but the experience is worth it. VS Code runs Jupyter notebooks natively and can connect to generative AI for code completion and debugging. If you are new to VS Code, this is a good way to get familiar with it. If you are an experienced VS Code user, this workflow will be a big improvement over the JupyterLab interface.
Install VS Code
Install Visual Studio Code.
Open VS Code and install the following extensions from the Extensions panel (Ctrl+Shift+X / Cmd+Shift+X):
Create an environment with pip or conda to install RNAvigate. Either method works: VS Code detects pip and conda environments automatically.
python -m venv rnavigate-env
source rnavigate-env/bin/activate
pip install rnavigate
Note
On Windows, use rnavigate-env\Scripts\activate instead.
or
conda env create -f environment.yml
conda activate rnavigate
Open a Notebook
Use VS Code to open your working directory.
Create a new Jupyter Notebook: press Ctrl+Shift+P (Cmd+Shift+P on macOS), type Jupyter: Create New Jupyter Notebook, and press Enter.
Click Select Kernel in the top-right corner of the notebook, choose Python Environments, and select
rnavigate-env.
Test the Installation
See Test Plot below.
UNC Longleaf
For UNC users working on the Longleaf HPC cluster.
Install the Environment
Load the required modules and create a conda environment. This does not change your default modules: they will be restored on your next login.
module rm python pymol pyrosetta
module load anaconda/2019.10
Follow the instructions in the Install Conda and create the environment section
above (don’t run jupyter lab) to create an environment with RNAvigate.
If this completes without errors, exit Longleaf and open UNC’s OpenOnDemand Service.
Connect to Jupyter on OnDemand
Log in with your ONYEN and start a Jupyter Notebook.
Click Interactive Apps and under Servers click Jupyter Notebook.
Enter the number of hours you will need, set CPU to 1, and leave other fields blank.
Don’t forget to save your work before time runs out!
Test the Installation
See Test Plot below.
Test Plot
Run the following in a Jupyter Notebook cell to confirm RNAvigate is working correctly. This loads a built-in example dataset and generates an arc plot of DMS-MaP reactivity.
import rnavigate as rnav
from rnavigate.examples import tpp

rnav.plot_arcs(
    samples=[tpp],
    sequence="ss",
    structure="ss",
    profile="dmsmap",
)
If the plot appears without errors, your installation is working correctly.